The Transformative Power of Artificial Intelligence: Shaping the Future In the realm of technological advancements, few innovations have captured the world's imagination as much as Artificial Intelligence (AI). From science fiction to reality, AI has become a powerful force driving transformative changes across various industries and sectors. Its significance cannot be overstated, as it has the potential to reshape the way we live, work, and interact with our surroundings. In this blog, we delve into the importance of AI and explore the profound impact it has on our society. 1. Enhancing Efficiency and Productivity: One of the most apparent benefits of AI is its ability to boost efficiency and productivity across industries. By automating repetitive tasks, AI liberates human resources to focus on more complex and creative endeavors. Businesses can streamline processes, optimize resource allocation, and make data-driven decisions faster, resulting in cost savings and increased com...
Command line git commands:
Check the installed version of git by using the command below:
git --versionInitialize a new repository
Create a directory to store your project in. To do this, use the following command:
mkdir my-git-repo
Now navigate to the directory you created.
cd my-git-repo
Next, initialize a new repository by using the following command:
git init
The git init command creates a new Git repository. In our case, it transformed the current directory into a Git repository. It can also be used to convert an existing, unversioned project to a Git repository or to initialize a new, empty repository.
Executing git init creates a .git subdirectory in the current working directory, which contains all of the necessary Git metadata for the new repository. This metadata includes subdirectories for objects, refs, and template files. A HEAD file is also created which points to the currently checked out commit.
If you've already run git init on a project directory containing a .git subdirectory, you can safely run git init again on the same project directory. The operation is what we call idempotent; running it again doesn't override an existing .git configuration.
Configure Git
Git uses a username to associate commits with an identity. It does this by using the git config command. To set Git username use the following command:
git config --global user.name "Name"
Replace Name with your name. Any future commits you push to GitHub from the command line will now be represented by this name. You can use git config to even change the name associated with your Git commits. This will only affect future commits and won't change the name used for past commits.
Let's set your email address to associate it with your Git commits.
git config --global user.email "user@example.com"
Replace user@example.com with your email-id. Any future commits you now push to GitHub will be associated with this email address. You can even use git config to change the user email associated with your Git commits.
Git Operations
Let's now create a text file named README. We will be using the nano editor for this.
nano README
Type any text within the file, or you can use the following text:
This is my first repository.
Save the file by pressing Ctrl-o, Enter key, and Ctrl-x.
Git is now aware of the files in the project. We can check the status using the following command:
git status
This command displays the status of the working tree. It also shows changes that have been staged, changes that haven't been staged, and files that aren't tracked by Git.
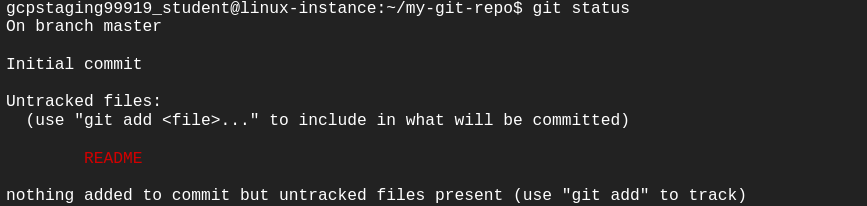
You can now see the file you created, README, under the section Untracked files. Git isn't tracking the files yet. To track the files, we have to commit these files by adding them to the staging area.
Now let's add the file to the staging area using the following command:
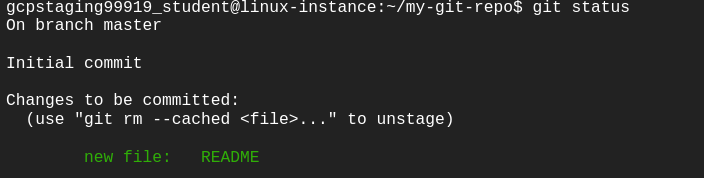
git add README
This command adds changes from the working tree to the staging area i.e., it gathers and prepares files for Git before committing them. In other words, it updates the index with the current content found in the working tree to prepare the content that's staged for the next commit.
You can now view the status of the working tree using the command: git status. This now shows the file README in green i.e., the file is now in the staging area and yet to be committed.
However, git add doesn't affect the repository in any serious way because changes are not actually recorded until you commit them.
Let's now commit the changes. A Git commit is equivalent to the term "Save".
Commit the changes using the following command:
git commitThis now opens an editor, asking you to type a commit message. Every commit has an associated commit message. A commit message is a log message from the user describing the changes.
Enter the commit message of your choice or you can use the following text:
This is my first commit!
Once you have entered the commit message, save it by pressing Ctrl-o and Enter key. To exit click Ctrl-x.
The git commit command captures a snapshot of the project's currently staged changes i.e., it stores the current contents of the index in a new commit along with the commit message.
Let's now re-edit the file again to understand the process better. Open the file README using nano editor.
nano README
Now add another line of description for your repository below the earlier entered line. Add the description of your choice or you can use the following text:
A repository is a location where all the files of a particular project are stored.
Save and exit the editor by pressing Ctrl-o, Enter key, and Ctrl-x.
Now, let's repeat the previous process. As mentioned earlier, you can always check the status of your repository by using:
git status
To understand the difference, compare with the earlier scenario where you added the new file to the repository.
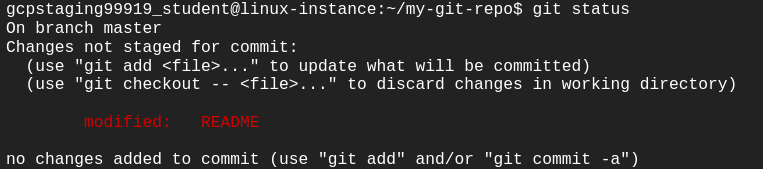
Git tracks the changes and displays that the file has been modified. You can view the changes made to file using the following command:
git diff README
You can see the differences between the older file and the new file. New additions are denoted by green-colored text and a + sign at the start of the line. Any replacements/removal are denoted by text in red-colored text and a - sign at the start of the line.
Now, we will add these changes to the staging area.
git add README
View the status of the repository using the following command:
git status
Git now shows the same file in green-colored text. This means the changes are staged and ready to be committed.
Let's commit the file now by entering the commit message with the command itself, unlike the previous commit.
git commit -m "This is my second commit."
The command git commit with -m flag takes the commit message, too. This is different to the command without flag, where you had to type the commit message within the editor. If multiple -m flags are given to the command, it concatenates the values as separate paragraphs.
To view all the commits use the following command:
git log
Git log command shows the commit history of the repository. It shows all the commits on the repository represented by a unique commit ID at the top of each commit. It also shows the author, date, and time and the commit message associated with the commits.
You also have various options to limit the output of this command. The output can be filtered based on the last number of commits, author, commit message, etc.
Congratulations!
Congrats! You've successfully installed the Git, initialized a repository, and performed basic Git operations. Now that you know how to do this, it will be easier for you and your team to work on a huge project with multiple functionalities and modules
Comments
Post a Comment